Translator Revolution Pro (PHP script)
Installation
1. Minimum requirements
In order to install this script on your web site, you should:
- Feel comfortable copying and unzipping files.
- Feel comfortable uploading files to your hosting server, either with a FTP utility or using a File Manager (if the hosting service provides one).
- Use a text or visual editor (like Dreamweaver or Frontpage) to edit the PHP files to place the translator's initialization code.
- Have a very basic HMTL knowledge.
Server requirements:
- PHP v5.x
2. Package contents
The purchased zip file contains:
- PHP / JavaScript / CSS files to generate the Translator Revolution PRO
- 4 rounded and 4 squared skins; each one in 10 different colors, totalizing 80 skins
- PSDs skins files
- Default templates files for advanced customization
3. Main installation guide
Keep in mind that all the translator's code will be placed in a
div HTML tag. If you don't know what a div is,
think of it as a box where you can place any content.-
Copy the
translatorfolder included in the zip file to your site's local folder. -
Set the appropriate permissions for the server to be able to write on the
translator/_cache/folder. - Determine in which part of your web page do you want to place the translator. The Firebug extension for Firefox will help you a lot. After installed, open your web site with Firefox and determine where do you want to place the translator, then right click on that spot and choose the last option: "Inspect Element" to see its HTML code, now you know what to search for when you edit this file in the next step.
-
Edit your PHP file using your favorite text or visual editor. If your web site is static HTML, then you will need to change the files extensions to PHP or use the
power of
htaccessto change the behavior of the HTML, but that subject is beyond the scope of this installation guide. -
Place the initialization code in the selected spot. This is just an example of a web site where the translator is being placed:
							<div id="header">

							    <div class="company_container">

							        Apple

							    </div>

							    <div class="menu_container">

							        <ul>

							            <li><a href="/home">Home</a></li>

							            ...

							            <li><a href="/about-us">About Us</a></li>

							        </ul>

							    </div>

							    <div class="my_selected_spot">


								<!-- translator begins -->

								<?php

								require_once dirname(__FILE__) . '/translator/main.class.php';

								TranslatorManager::initialize();

								?>

								<!-- translator ends -->


							    </div>

</div> -
Notice the line:
It will load the translator's main PHP class.require_once dirname(__FILE__) . '/translator/main.class.php';
The codedirname(__FILE__)returns the current file's folder, and then is concatenated to build the whole path to the main PHP class. In this example, thetranslatorfolder is placed in the same folder as the modified file.
If the specified path is wrong, you will get an error message like this one:
							Warning: require_once(/a_wrong_path/main.class.php) [function.require-once]: failed to open stream: No such file or directory in /var/www/translator/home.php on line 78


Fatal error: require_once() [function.require]: Failed opening required '/a_wrong_path/main.class.php' (include_path='.:/usr/share/php:/usr/share/pear') in /var/www/translator/home.php on line 78 -
Getting an API Key:
The SurStudio Translate API requires an API Key. In order to get one, follow the steps:-
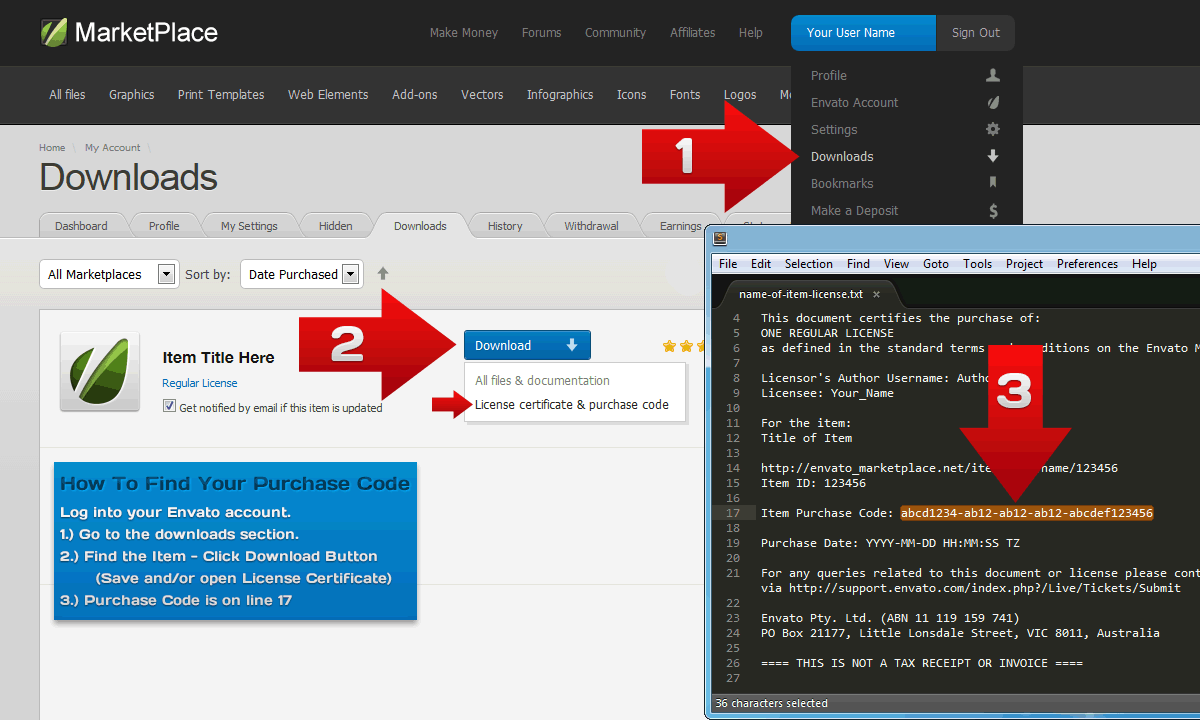
Get the
Item Purchase Code.
-
- Go to http://codecanyon.net/user/SurStudio/
-
On the lower right side there's the following email form:

-
Send a message with the purchase info. The following sample message could be used as template (highlighted is the required info):
									Hello there,


									here I'm attaching the required info to get a key to use the translation service.


									Email: john.doe@emaildomain.com

									Item Purchase Code: f4b3ae24-d23f-42a3-80a6-41c37ced6961

									Website's base URL(s): mydomain.com, sales.mydomain.com, mysubdomain.mydomain.com

									Website's source language: English
- An email will be sent back shortly, with the API Key.
-
Get the
-
Place the API Key and select the elements to be translated:
							<div id="header" class="translate">

							    <div class="company_container">

							        Apple

							    </div>

							    <div class="menu_container">

							        <ul>

							            <li><a href="/home">Home</a></li>

							            ...

							            <li><a href="/about-us">About Us</a></li>

							        </ul>

							    </div>

							    <div class="my_selected_spot">


								<!-- translator begins -->

								<?php

								require_once dirname(__FILE__) . '/translator/main.class.php';

								TranslatorManager::initialize('

								    api_key = A65A1D6789C4262632B38305AE4975A61C054A01

								    target_selectors = translate

								');

								?>

								<!-- translator ends -->


							    </div>

							</div>
-
As an alternative option, the API Key can be placed in the
/translator/config.class.phpfile, line number 88:
api_key = A65A1D6789C4262632B38305AE4975A61C054A01 -
If your web site's name is "Apple", you probably don't want to get it translated:
							<div id="header" class="translate">

							    <div class="company_container dont_translate">

							        Apple

							    </div>

							    <div class="menu_container">

							        <ul>

							            <li><a href="/home">Home</a></li>

							            ...

							            <li><a href="/about-us">About Us</a></li>

							        </ul>

							    </div>

							    <div class="my_selected_spot">


								<!-- translator begins -->

								<?php

								require_once dirname(__FILE__) . '/translator/main.class.php';

								TranslatorManager::initialize('

								    api_key = A65A1D6789C4262632B38305AE4975A61C054A01

								    target_selectors = translate

								    exclude_selectors = dont_translate

								');

								?>

								<!-- translator ends -->


							    </div>

</div> -
In this example, instead of using the
exclude_selectorssetting, we can just select the menu:
							<div id="header">

							    <div class="company_container">

							        Apple

							    </div>

							    <div class="menu_container translate">

							        <ul>

							            <li><a href="/home">Home</a></li>

							            ...

							            <li><a href="/about-us">About Us</a></li>

							        </ul>

							    </div>

							    <div class="my_selected_spot">


								<!-- translator begins -->

								<?php

								require_once dirname(__FILE__) . '/translator/main.class.php';

								TranslatorManager::initialize('

								    api_key = A65A1D6789C4262632B38305AE4975A61C054A01

								    target_selectors = translate

								');

								?>

								<!-- translator ends -->


							    </div>

</div> -
As you see, the selection is made by using the
classHTML attribute:
Before:
After:<div id="header">
<div id="header" class="translate"> -
More than one
classHTML attribute can be specified:
Before:
After:<div class="menu_container">
<div class="menu_container translate">
4. Basic settings
The translator comes with a default configuration, you can see it in the
You have seen two settings already:
All the default settings can be changed, either in the
translator/_class/config.class.php file.You have seen two settings already:
target_selectors and exclude_selectors. In the previous examples these two settings overrode the default values defined in the translator/_class/config.class.php file.All the default settings can be changed, either in the
translator/_class/config.class.php file or when the translator is being initialized.-
The settings specified in the initialization line will override the default settings. For instance:
This will create a translator with:<?php
require_once dirname(__FILE__) . '/translator/main.class.php';
TranslatorManager::initialize('
target_selectors = translate
exclude_selectors = dont_translate
languages = German,Italian,Japanese,Portuguese,Russian,Spanish,Chinese,Danish,Dutch,French
bar.show_swap_button = true
tab.cols = 2
tab.title_label = Select language
');
?>- the German, Italian, Japanese, Portuguese, Russian, Spanish, Chinese, Danish, Dutch and French languages
- organized in 2 columns
- showing the swap languages button
- showing the custom "Select language" title
-
You can also place these settings in the
translator/_class/config.class.phpfile. And then initialize the translator without any setting:
								<?php

								require_once dirname(__FILE__) . '/translator/main.class.php';

								TranslatorManager::initialize();

?> -
The initialization string, is that, just a string, so the translator can be initialized dynamically:
								function getRandomSkin() {

								    $skins = array('orange_classic', 'blue_classic', 'green_classic');

								    shuffle($skins);

								    return $skins[0];

								}


								TranslatorManager::initialize('

								    skin = ' . getRandomSkin() . '

								    target_selectors = translate

								    exclude_selectors = dont_translate

'); - You can see the reference for more information.
5. Advanced settings
On some special occasions, all the configuration settings might not be enough to customize the translator in the desired way.
The translator's HTML code is generated using a lightweight template engine, and can specify your own templates; for that purpose there are the following settings:
The templates files are located in the
* In order to make these modifications you should have a very good PHP, HTML and CSS knowledge.
The translator's HTML code is generated using a lightweight template engine, and can specify your own templates; for that purpose there are the following settings:
template = translator_default.tpl #this is the main template, it contains: the bar, the tab, the restore button, the loading message and the JavaScript initialization routinebar.template = bar_default.tpl #this is the bar template, it contains: the from and to labels and buttons, and the swap languages button toobar.template_item = tab_item_default.tpl #this is the language item template in the bar, it contains: the language name and flag imagetab.template = tab_default.tpl #this is the tab template, it contains: the title, the main languages table and the close buttontab.template_item = tab_item_default.tpl #this is the language item template in the tab, it contains: the language name and flag imagetemplate_js = js_default.tpl #this is the template to load the JavaScript file, it contains: HTML codetemplate_css = css_default.tpl #this is the template to load the CSS files, it contains: JavaScript code
translator/_templates folder.* In order to make these modifications you should have a very good PHP, HTML and CSS knowledge.
6. Translating AJAX generated content
If you would like to translate AJAX generated content, you should set the
re_select_on_translation setting to true, either on the initialization string
or in the translator/_classes/config.php file:
						<?php

						require_once dirname(__FILE__) . '/translator/main.class.php';

						TranslatorManager::initialize('

						    re_select_on_translation = true

						');

						?>
7. Uploading
Using your favorite FTP utility or a web based file manager (if provided by your hosting service), upload the
In the above example, the
The
If you are placing the
CSSs, JavaScripts and images files are loaded by the internet browser. Since defaults paths doesn't begin with a slash (/),
they are relative paths, relative to the file who is loading them.
Lets say you want to upload the
translator folder and the modified files.In the above example, the
translator folder should be placed in the same folder as the modified file.The
translator folder can be placed anywhere, not necessarily in the same folder as the files that are going to use it. Remember to place the path to load the main class.If you are placing the
translator folder in other location, you will also have to adjust the path settings for the CSS and JavaScript files:css = translator/_styles/main.cssjs = translator/_javascript/translator.class.jsflags_folder = translator/_images/flags/skins_css_folder = translator/_styles/skins/skins_image_folder = translator/_images/skins/
Lets say you want to upload the
translator folder to a plugins folder in your server's root folder. Then, instead of relative paths
you can specify absolute paths:css = /plugins/translator/_styles/main.cssjs = /plugins/translator/_javascript/translator.class.jsflags_folder = /plugins/translator/_images/flags/skins_css_folder = /plugins/translator/_styles/skins/skins_image_folder = /plugins/translator/_images/skins/