Translator Revolution Pro (PHP script)
Step by step installation
- Introduction
- The original webpage
- Overview of the folder structure
- Copying the translator's files
- Selecting a spot to place the translator
- Placing the translator's code
- Changing the translator's folder location
- Modifying the default settings
- Selecting areas to translate and to exclude from translation
- Adjusting the layout
- Watch the video
1. Introduction
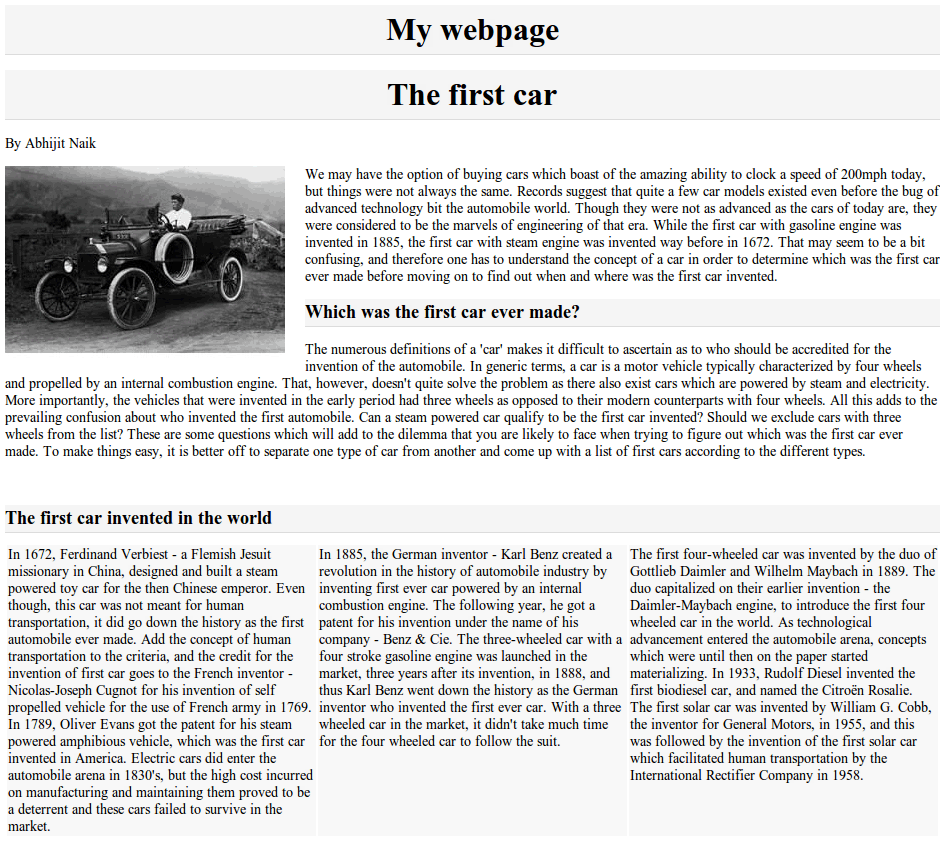
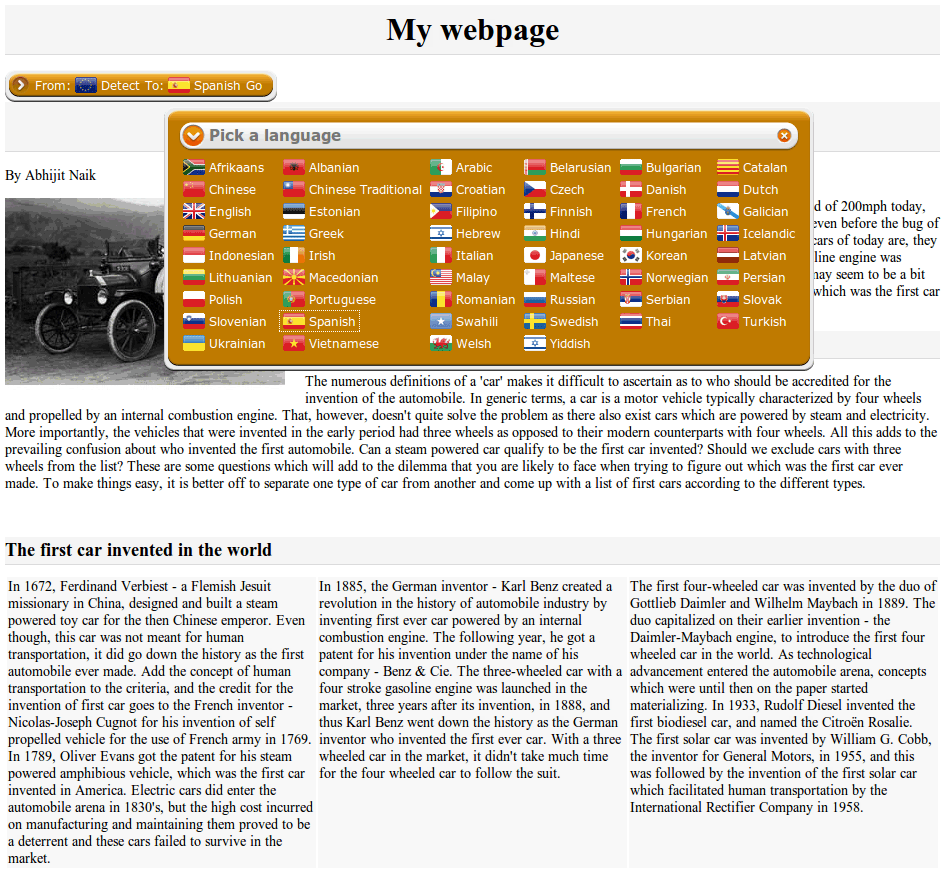
2. The original webpage
-
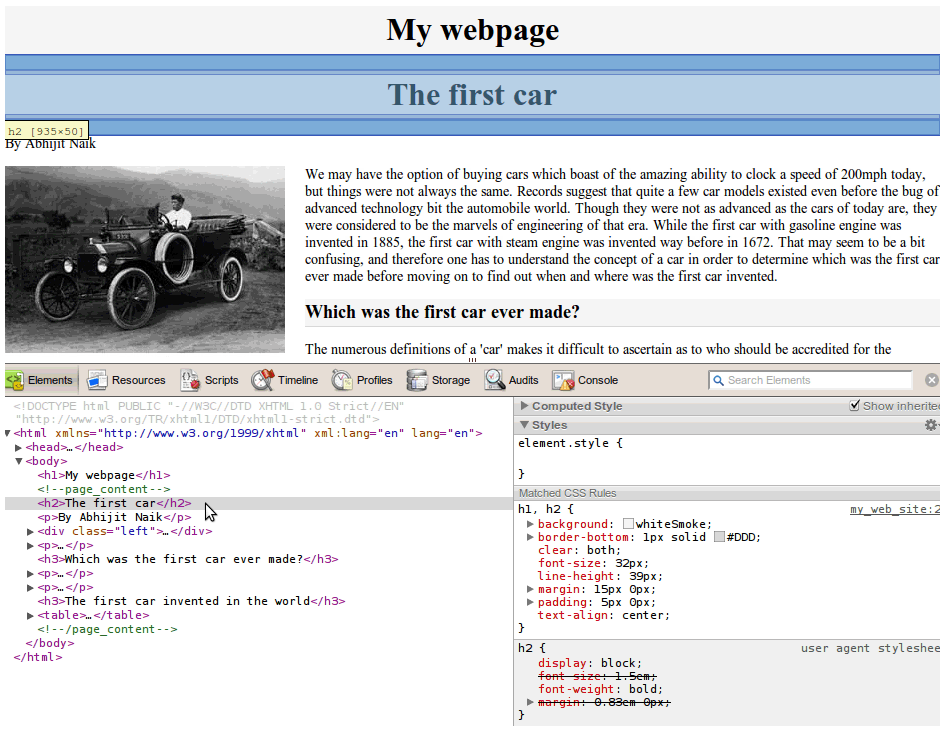
The original webpage looks like this (
/help/project/step_2/webpage.php):
-
And its XHTML looks like this (
/help/project/step_2/webpage.php):

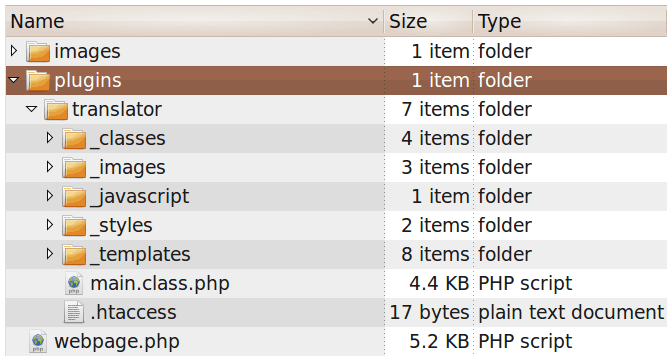
3. Overview of the folder structure
-
The folder structure (
/help/project/step_2/):

4. Copying the translator's files
-
On the package's folder structure, identify the translator's main folder:
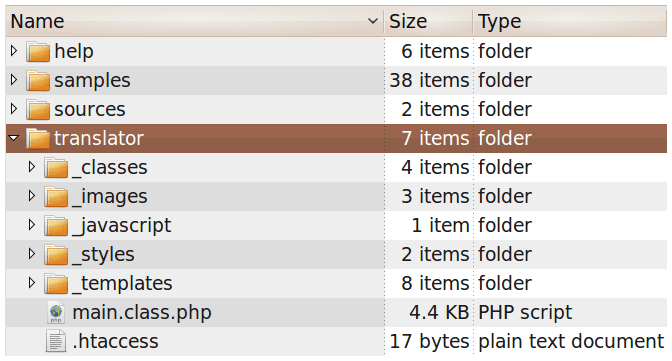
-
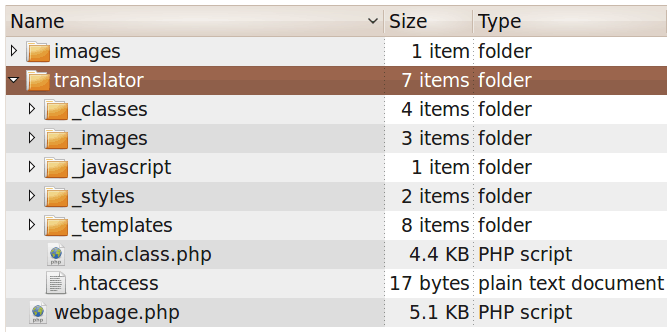
Copy and paste the
translatorfolder to the website's root folder (/help/project/step_4/):
5. Selecting a spot to place the translator
-
Using a XHTML DOM inspector (which is built in Chrome and in Internet Explorer 9, also can download the Firebug plugin for Firefox too), select an element which is close to the desired spot, for instance, the "The first car" header:
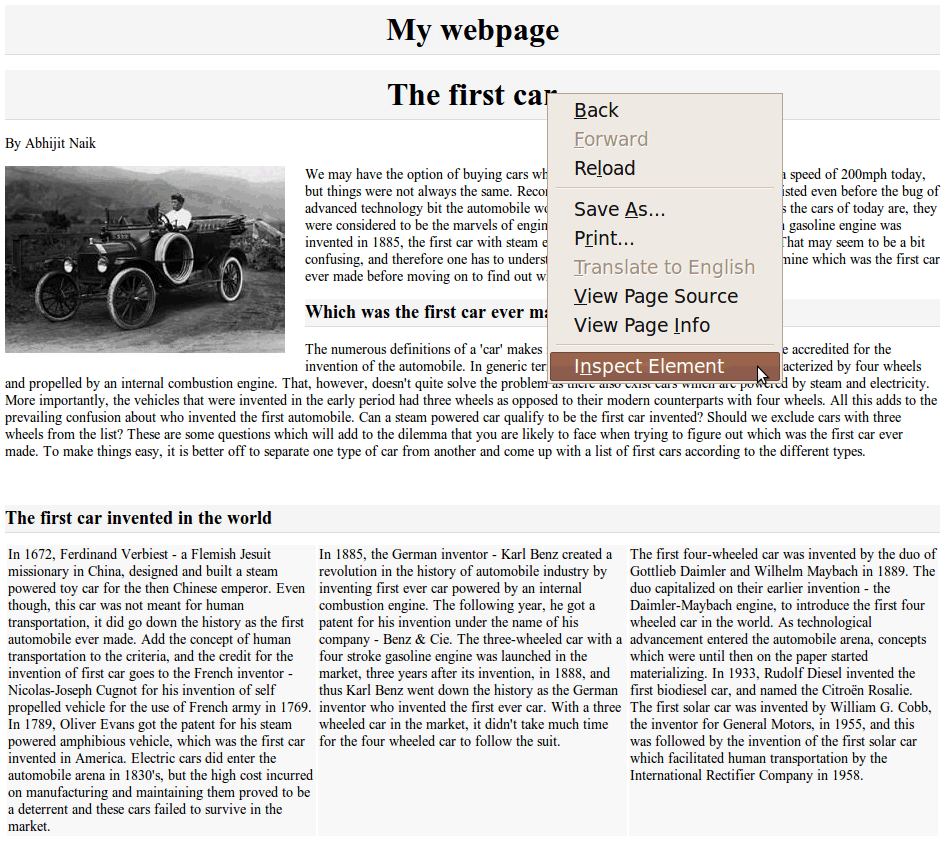
-
Identify the HTML code,
<h2>The first car</h2>:
-
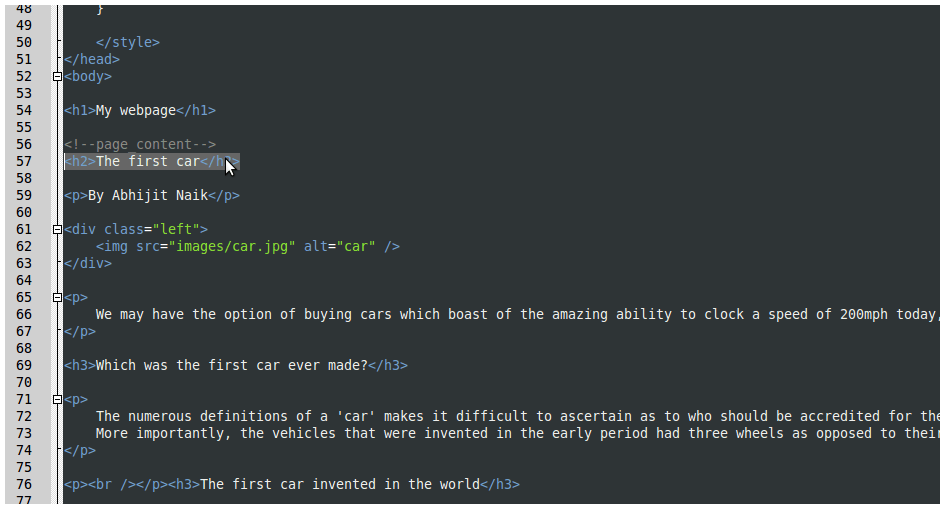
Find the HTML code (
/help/project/step_4/webpage.php):
6. Placing the translator's code
-
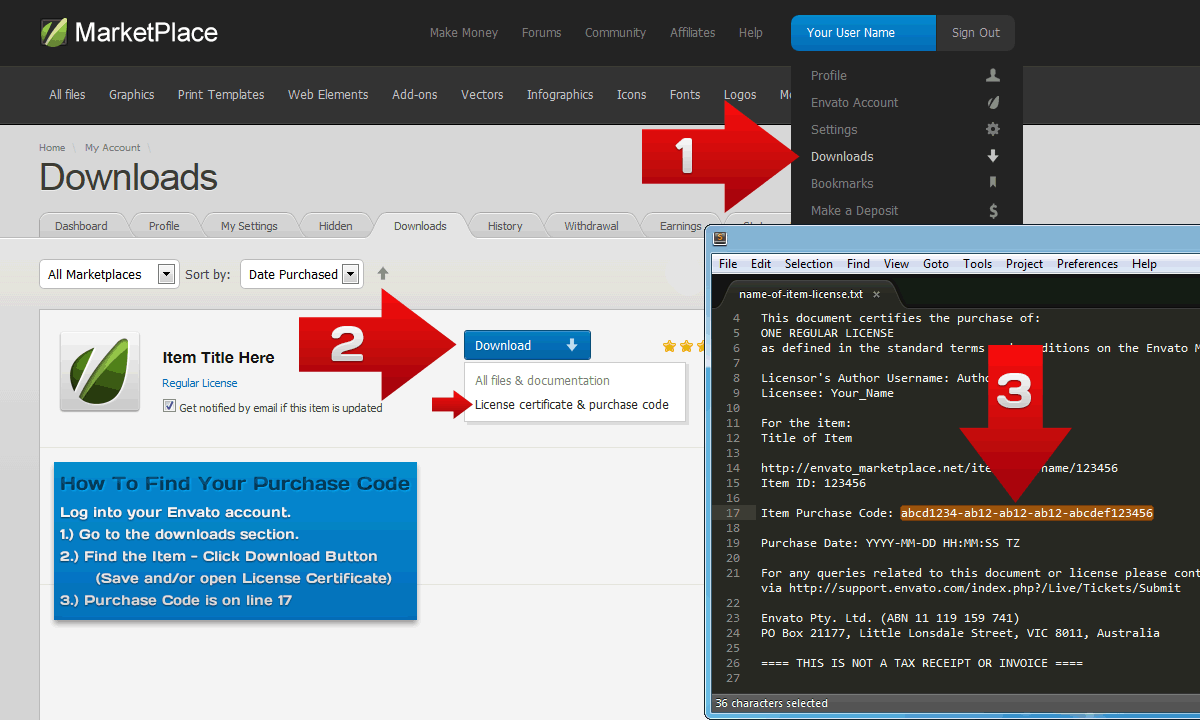
The SurStudio Translate API requires an API Key. In order to get one, follow the steps:
-
Get the
Item Purchase Code.
-
- Go to http://codecanyon.net/user/SurStudio/
-
On the lower right side there's the following email form:

-
Send a message with the purchase info. The following sample message could be used as template (highlighted is the required info):
								Hello there,


								here I'm attaching the required info to get a key to use the translation service.


								Email: john.doe@emaildomain.com

								Item Purchase Code: f4b3ae24-d23f-42a3-80a6-41c37ced6961

								Website's base URL(s): mydomain.com, sales.mydomain.com, mysubdomain.mydomain.com

								Website's source language: English
- An email will be sent back shortly, with the API Key.
-
Get the
-
Place the API Key in the
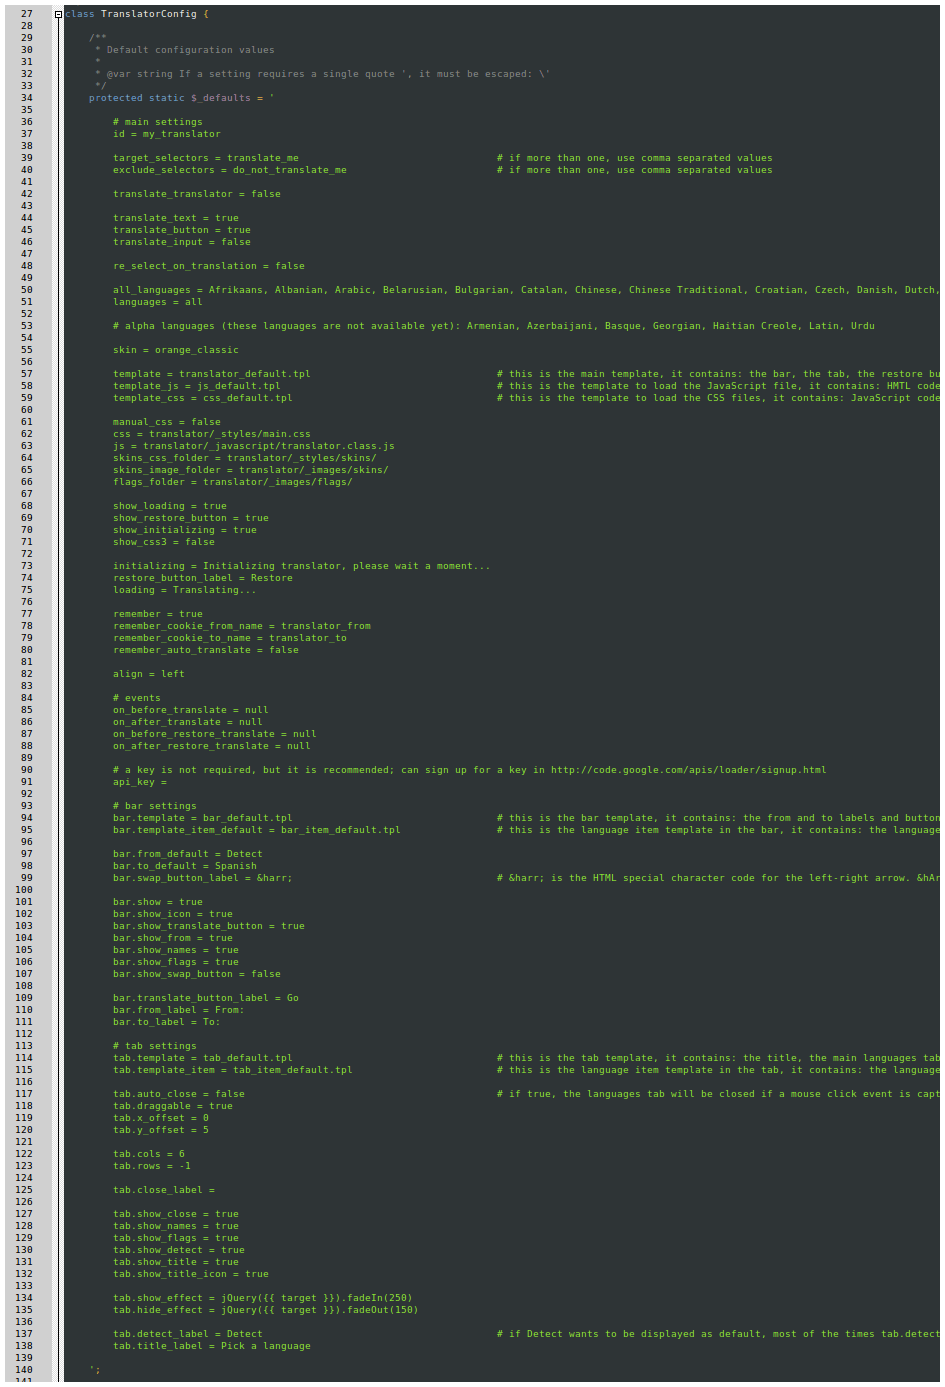
/translator/config.class.phpfile, line number 88:
api_key = A65A1D6789C4262632B38305AE4975A61C054A01
-
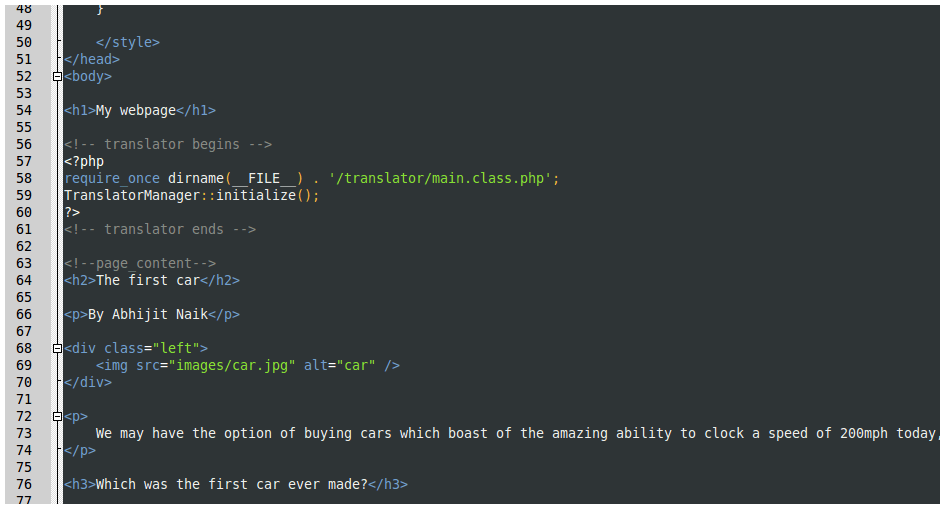
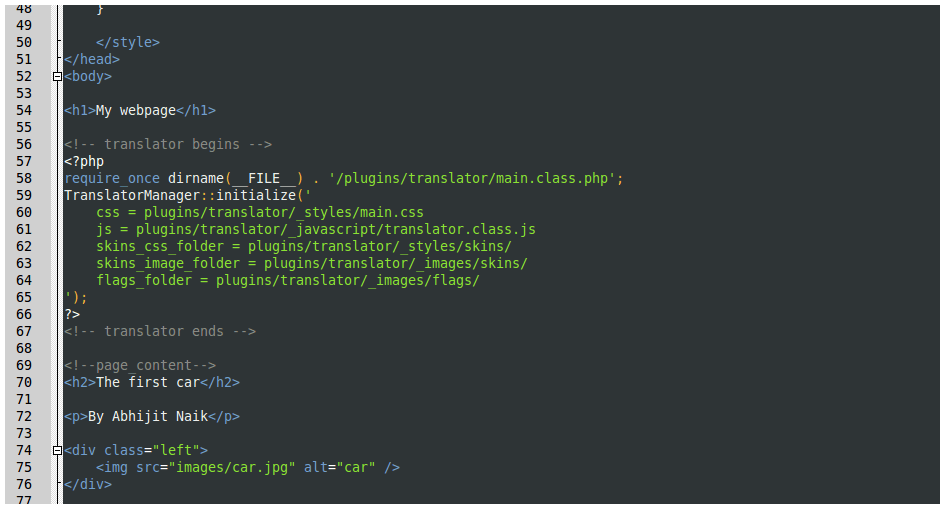
Add the initialization lines in the previously selected spot:
							<!-- translator begins -->

							<?php

							require_once dirname(__FILE__) . '/translator/main.class.php';

							TranslatorManager::initialize();

							?>

							<!-- translator ends -->
-
Before (
/help/project/step_4/webpage.php):
-
After (
/help/project/step_6/webpage.php):
-
Open on the browser:
-
Notice the line:
It will load the translator's main PHP file.require_once dirname(__FILE__) . '/translator/main.class.php';
The codedirname(__FILE__)returns the current file's folder, and then is concatenated to build the whole path to the main PHP file. In this example, thetranslatorfolder is placed in the same folder as thewebpage.phpfile.
If the specified path is wrong, you will get an error message like this one:
							Warning: require_once(/help/project/step_6/a_wrong_path/translator/main.class.php) [function.require-once]: failed to open stream: No such file or directory in /help/project/step_6/webpage.php on line 58


							Fatal error: require_once() [function.require]: Failed opening required '/help/project/step_6/a_wrong_path/translator/main.class.php' (include_path='.:/usr/share/php:/usr/share/pear') in /help/project/step_6/webpage.php on line 58
7. Changing the translator's folder location
-
Create a new folder named
pluginsand move in the translator's folder (/help/project/step_7/):
-
Modify the initialization lines (
/help/project/step_7/webpage.php):
							<!-- translator begins -->

							<?php

							require_once dirname(__FILE__) . '/plugins/translator/main.class.php';

							TranslatorManager::initialize('

							    css = plugins/translator/_styles/main.css

							    js = plugins/translator/_javascript/translator.class.js

							    skins_css_folder = plugins/translator/_styles/skins/

							    skins_image_folder = plugins/translator/_images/skins/

							    flags_folder = plugins/translator/_images/flags/

							');

							?>

							<!-- translator ends -->
-
Before (
/help/project/step_6/webpage.php):
-
After (
/help/project/step_7/webpage.php):
-
Relative paths vs Absolute paths:
All the above settings:css,js,skins_css_folder,skins_image_folder,flags_folderare going to be used by the internet browser. This means that the specified paths are going to be either relative or absolute on the client side.
Taking the currentprojectsample, thewebpage.phppath could be (depends of course where the files are uploaded):http://my_test_server.com/help/project/step_7/webpage.php
Theplugins/translator/_styles/main.cssrelative path (since it doesn't start with a slash "/") is interpreted by the internet browser like this:
- Extract the current path from the URL:
http://my_test_server.com/help/project/step_7/webpage.php - Extracted path:
http://my_test_server.com/help/project/step_7/ - Build the new path:
http://my_test_server.com/help/project/step_7/+plugins/translator/_styles/main.css - Final path:
http://my_test_server.com/help/project/step_7/plugins/translator/_styles/main.css
If the files and folders are well organized, then an absolute path could be specified, for instance:/plugins/translator/_styles/main.cssis interpreted by the internet browser like this:
- Since the path is an absolute path (starts with a slash "/"), the
/path is:http://my_test_server.com/ - Build the new path:
http://my_test_server.com/+plugins/translator/_styles/main.css - Final path:
http://my_test_server.com/plugins/translator/_styles/main.css
pluginsfolder on the server's root folder. - Extract the current path from the URL:
8. Modifying the default settings
-
The translator comes with a set of default settings. They are defined in the
translator/_classes/config.class.phpfile (/help/project/step_8/plugins/translator/_classes/config.class.php).
All the default settings can be changed, either in this file or when the translator is being initialized like in the previous example.
-
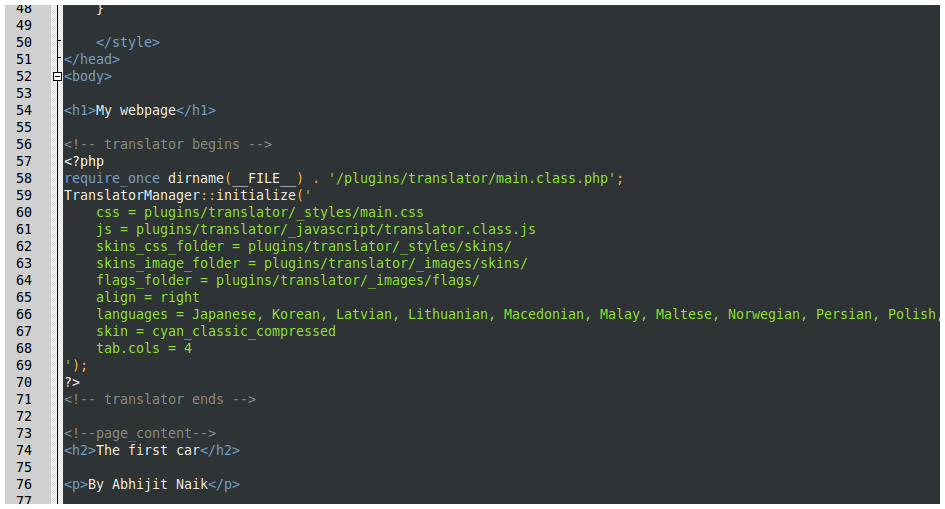
Modify the initialization line to align to the right side, change the skin and display specific languages organized in 4 columns (
http://my_test_server.com/help/project/step_8/webpage.php):
							<!-- translator begins -->

							<?php

							require_once dirname(__FILE__) . '/plugins/translator/main.class.php';

							TranslatorManager::initialize('

							    css = plugins/translator/_styles/main.css

							    js = plugins/translator/_javascript/translator.class.js

							    skins_css_folder = plugins/translator/_styles/skins/

							    skins_image_folder = plugins/translator/_images/skins/

							    flags_folder = plugins/translator/_images/flags/

							    align = right

							    languages = Japanese, Korean, Latvian, Lithuanian, Macedonian, Malay, Maltese, Norwegian, Persian, Polish, Portuguese, Romanian, Russian, Serbian, Slovak, Slovenian, Spanish, Swahili, Swedish, Thai

							    skin = cyan_classic_compressed

							    tab.cols = 4

							');

							?>

							<!-- translator ends -->
-
Before (
/help/project/step_7/webpage.php):
-
After (
/help/project/step_8/webpage.php):
-
Open on the browser:
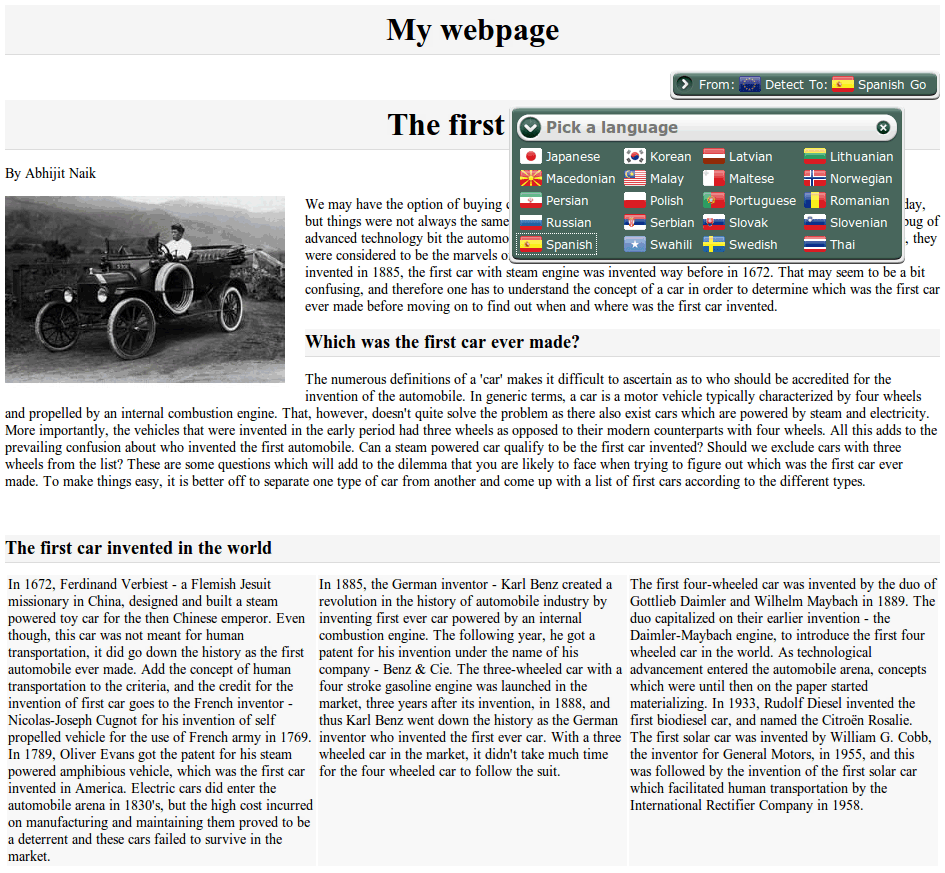
- Find all the information about the settings in the reference.
- Find all the information about the skins in the skins reference.
9. Selecting areas to translate and to exclude from translation
-
Modify the initialization line to specify the
target_selectorsand theexclude_selectorssettings:
							<!-- translator begins -->

							<?php

							require_once dirname(__FILE__) . '/plugins/translator/main.class.php';

							TranslatorManager::initialize('

							    css = plugins/translator/_styles/main.css

							    js = plugins/translator/_javascript/translator.class.js

							    skins_css_folder = plugins/translator/_styles/skins/

							    skins_image_folder = plugins/translator/_images/skins/

							    flags_folder = plugins/translator/_images/flags/

							    align = right

							    languages = Japanese, Korean, Latvian, Lithuanian, Macedonian, Malay, Maltese, Norwegian, Persian, Polish, Portuguese, Romanian, Russian, Serbian, Slovak, Slovenian, Spanish, Swahili, Swedish, Thai

							    skin = cyan_classic_compressed

							    tab.cols = 4

							    target_selectors = translate

							    exclude_selectors = dont_translate

							');

							?>

							<!-- translator ends -->
-
Before (
/help/project/step_8/webpage.php):
-
After (
/help/project/step_9/webpage.php):

-
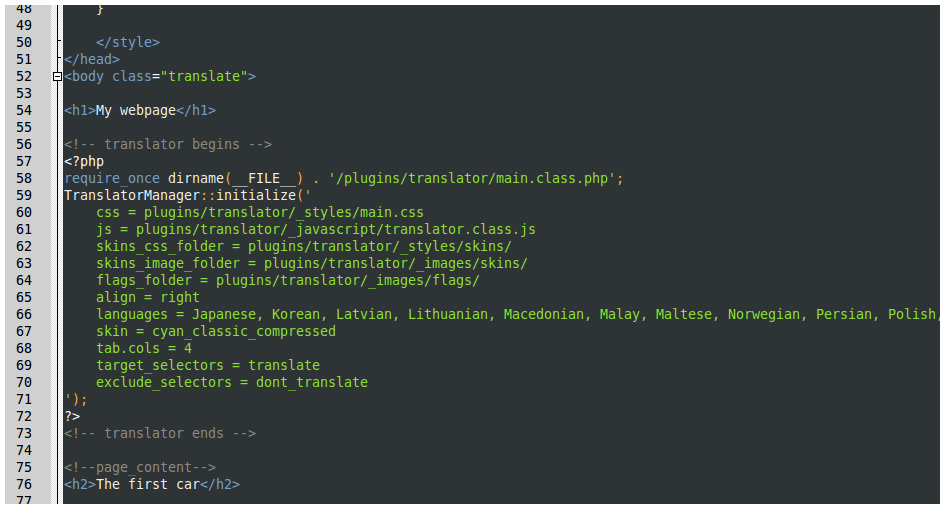
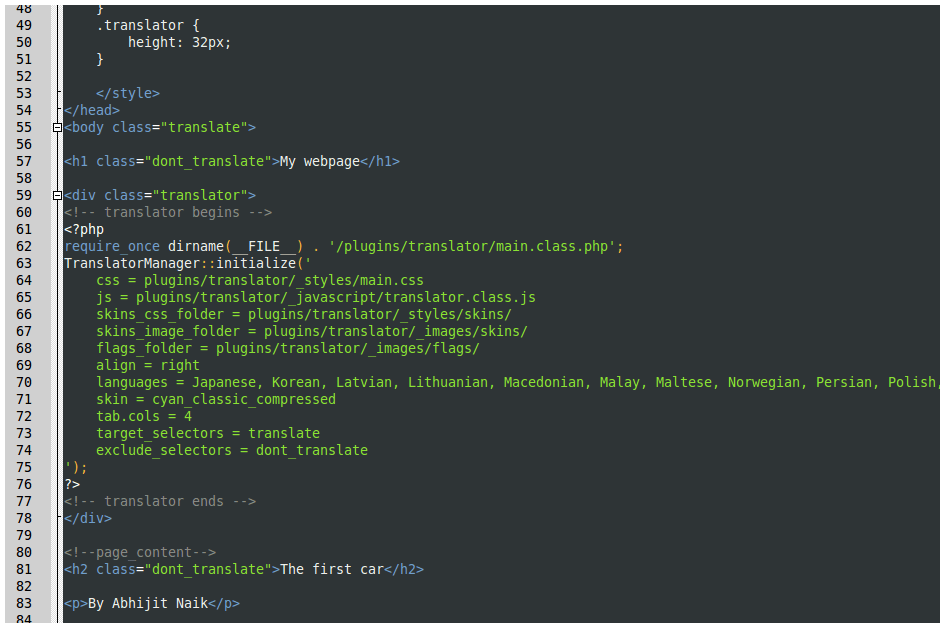
Modify the XHTML code to set the headers "My webpage" and "The first car" to be translated, by adding the
classattribute (/help/project/step_9/webpage.php):
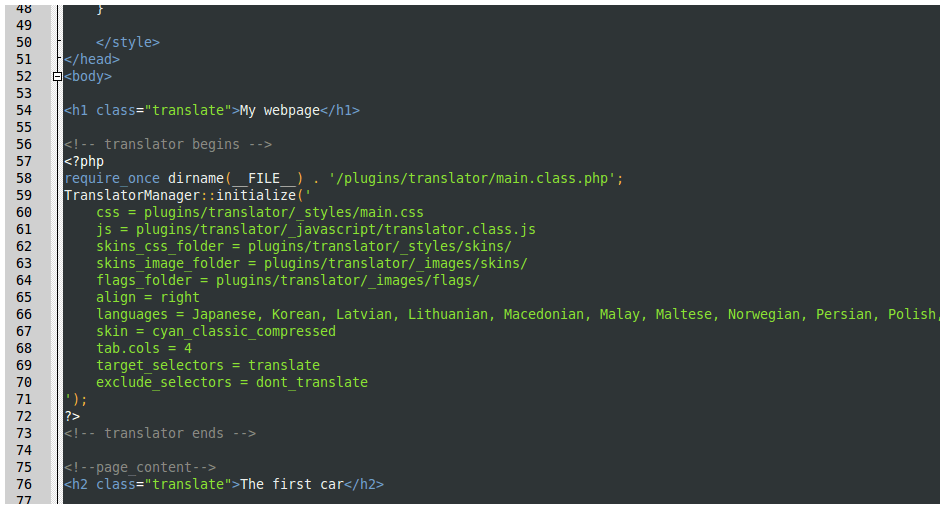
-
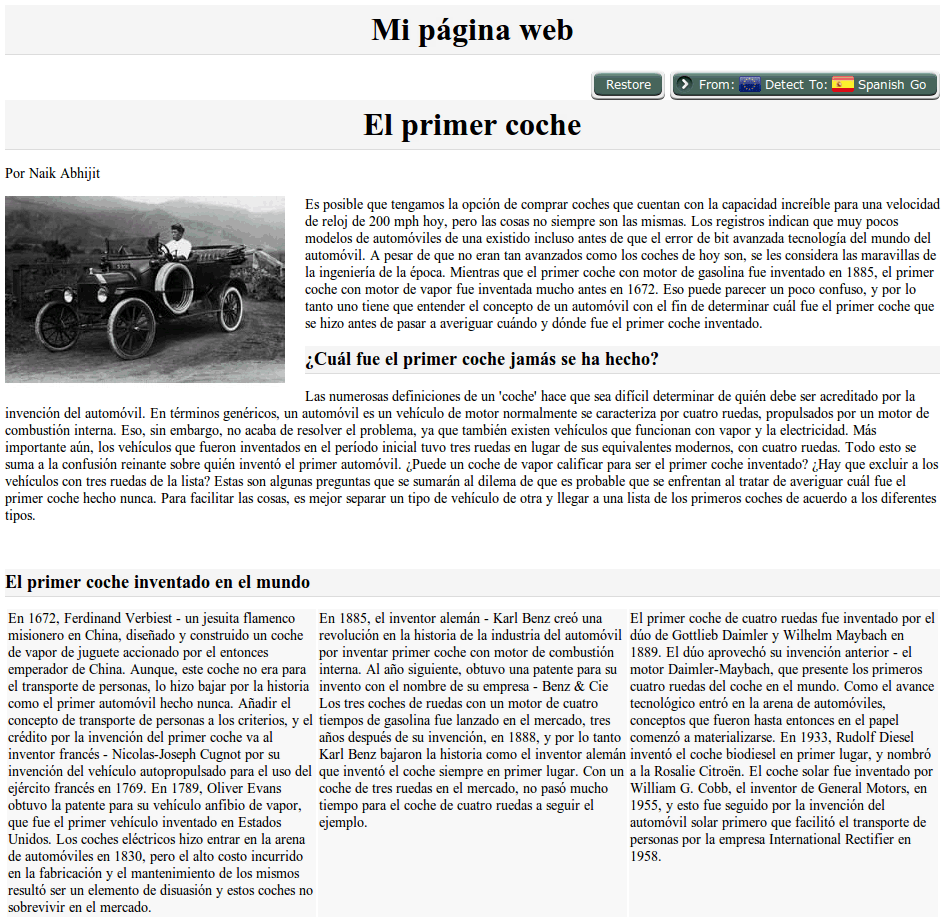
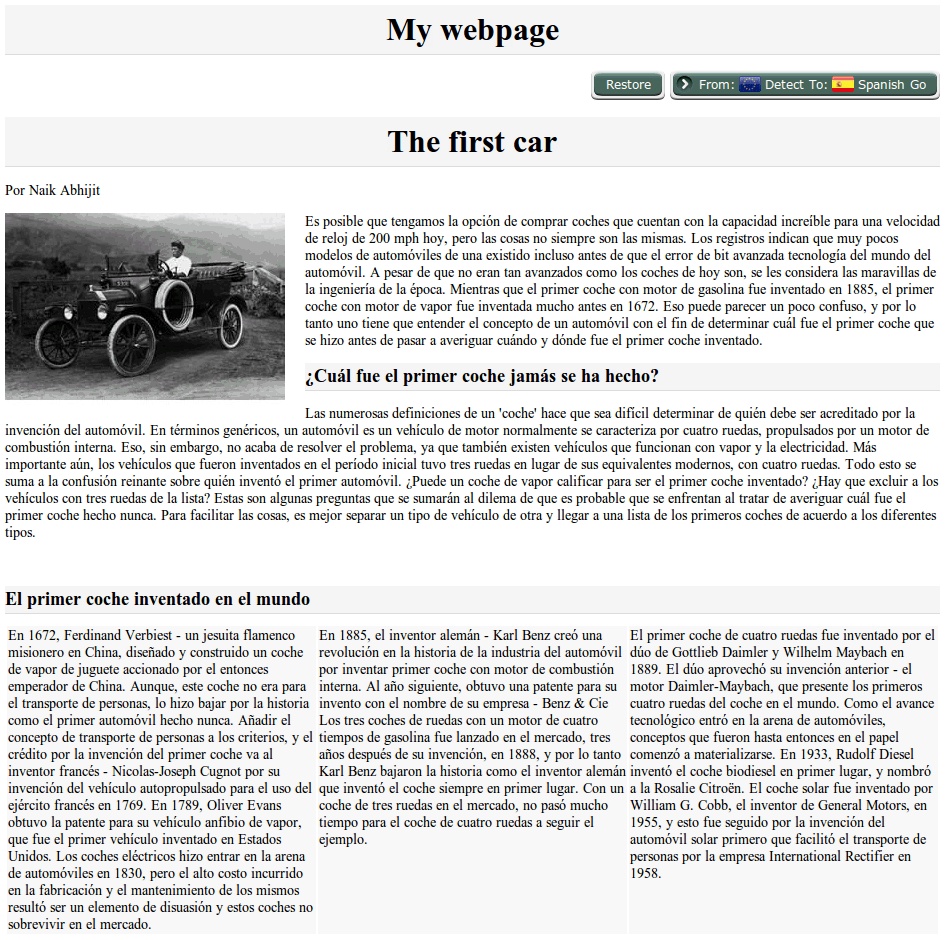
Open on the browser and translate:
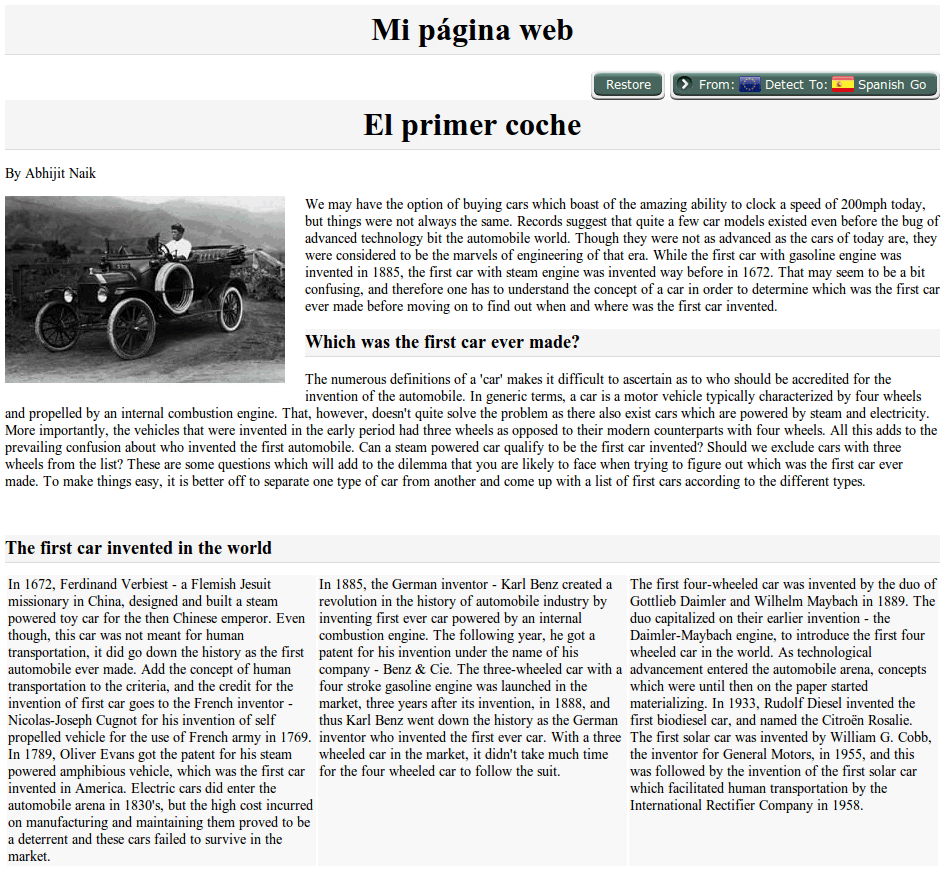
-
Modify the XHTML code to translate the whole page, by adding the
classattribute to thebodytag (/help/project/step_9/webpage.php):
(The previously addedclassattributes can be deleted since they are contained in thebodytag)
-
Open on the browser and translate:
-
Modify the XHTML code to exclude the headers "My webpage" and "The first car" from the translation (
/help/project/step_9/webpage.php):
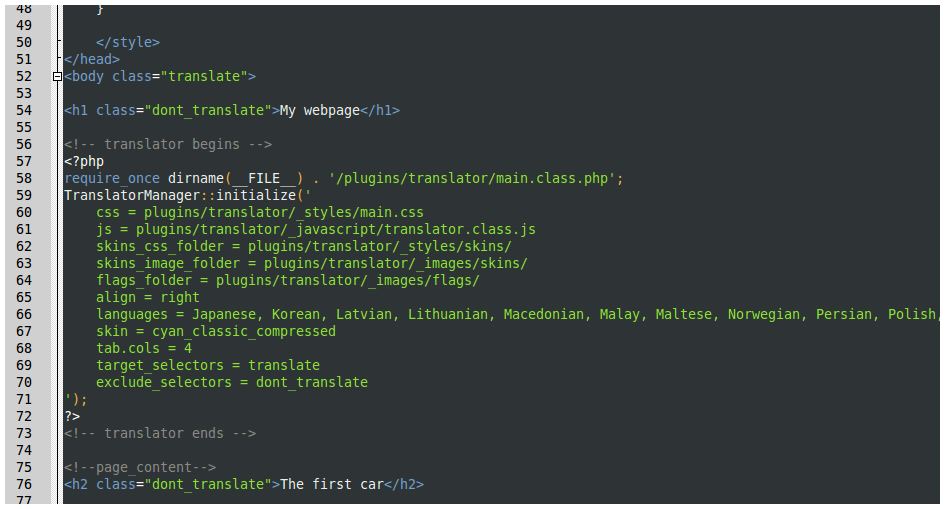
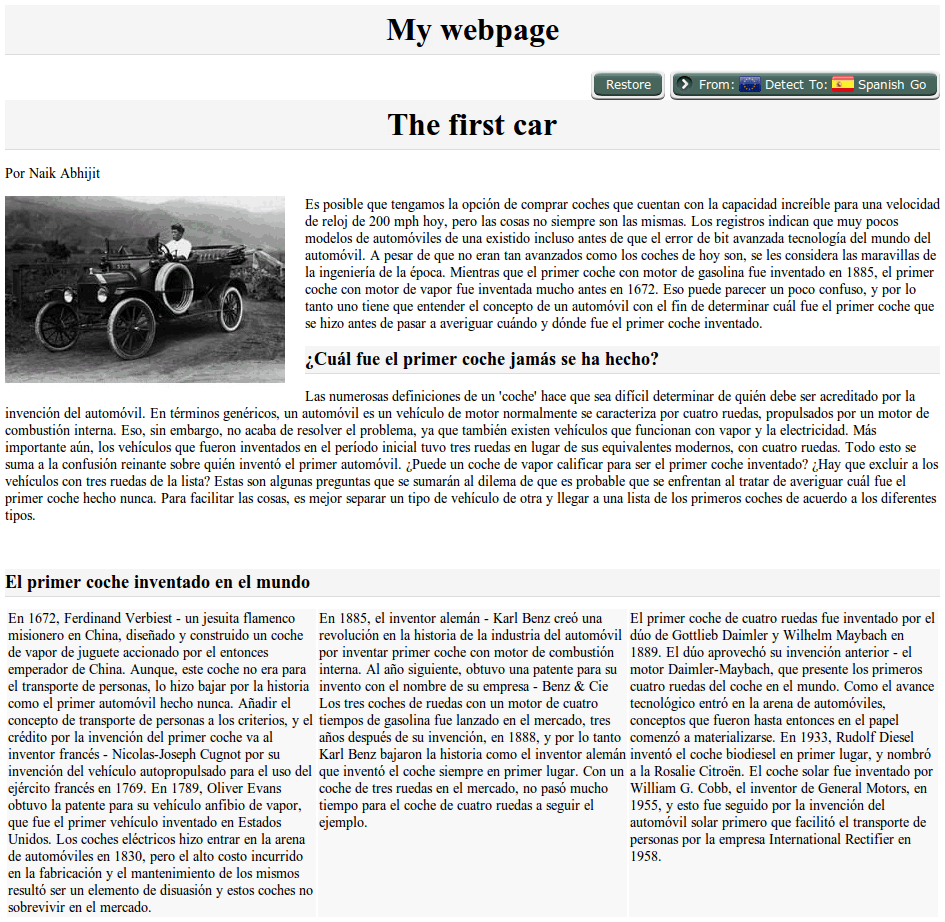
-
Open on the browser and translate:
10. Adjusting the layout
-
Modify the XHTML and CSS code to separate the translator from the "The first car" header/
Before (
/help/project/step_9/webpage.php):
-
After (
/help/project/step_10/webpage.php):
-
Open on the browser:
All the sample files used for the guide are in the
/help/project/folder.